Hey guys,
So to start off, found this article at this location:
Give credit where credit is due, is what I always say. However this was written for VMware 5.5 and the script didn’t work entirely out of the box as it did back in the 5.5 days. A little tweaking of the script and updating syntax was needed to get it working. The means of this article is to work thru the issues to get it working and just get the results. 🙂
To start you will need the following software and windows updates:
- PowerShell 3.0
- Windows PowerCLI 6.3.0 or higher
- Microsoft Visio 2010 or higher
After installing the following and having already owned a copy of Visio 2010, I was off and away on getting it working. Below is a step-by-step process of how to do this and also some errors you might get.
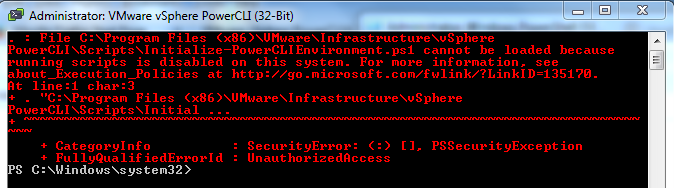
I assume at this point you have installed the 3 things listed above. Open up PowerShell or PowerCLI in a elevated state as an administrator and type the following command in either console. If you do not do this step you will get an error message like this when you attempt to establish connection with the vCenter Server with connect-viserver, as you will see here in PowerCLI, this same error will occur in PowerShell 3.0 too:
To avoid this restricted access type this:
Set-ExecutionPolicy unrestricted
After you apply this cmdlet, if you open this in PowerCLI, close the application and restart it, upon opening the application it should look like this:

Alternatively, if you entered this command in PowerShell 3.0, you do not need to restart PowerShell 3.0, you will though need to run an additional command:
Get-Module -Name VMware* -ListAvailable | Import-Module
as shown here:

Likewise while still in PowerShell 3.o for good measure, you should make sure a snap-in is loaded into PowerShell that is normally already loaded in PowerCLI and that command is as follows:
Add-PSSnapin VMware.VimAutomation.Core
as shown here:
![]()
Now at this stage in the game, after all of the modules are loaded and policies are set in both PowerCLI and PowerShell we can proceed to the next command. This command establishes a connection with vCenter with permissions of the user account that has full access to the VMware Datacenter and it’s child clusters. The command is as follows:
Connect-VIServer <vCenter FQDN or IP address> -Credential (Get-Credential)
As shown here:
![]()
After you have established connection with vCenter, you can run the script found in the website linked above. However for easy of use, here is the script. Make sure to modify your users my documents path at the bottom of the script to reflect your PC’s SID information. Also take note of the location of the Visio .vss file location in the script, make sure the Stencils are in the My Shapes folder.
Lastly, here is a a direct, link, to the Visio Stencils needed to get this working correctly. 🙂
Here is the script:
Connect-VIServer <vcenter FQDN or IP address> -Credential (Get-Credential)
$allclusters = Get-Cluster# Iterate for each cluster and generate and save the vCenter Network map visio diagram.
foreach ($cluster in $allclusters){
$shpFile1 = “VMware EUC Visio Stencils 2015.vss”
#VISIO Function for the Connection-of-objects
function connect-visioobject ($firstObj, $secondObj)
{
$shpConn = $pagObj.Drop($pagObj.Application.ConnectorToolDataObject, 0, 0)
#// Connect its Begin to the ‘From’ shape:
$connectBegin = $shpConn.CellsU(“BeginX”).GlueTo($firstObj.CellsU(“PinX”))
#// Connect its End to the ‘To’ shape:
$connectEnd = $shpConn.CellsU(“EndX”).GlueTo($secondObj.CellsU(“PinX”))
}#VISIO Function for adding the object into the drawing
function add-visioobject ($mastObj, $item)
{
Write-Host “Adding $item”
# Drop the selected stencil on the active page, with the coordinates x, y
$shpObj = $pagObj.Drop($mastObj, $x, $y)
# Enter text for the object
$shpObj.Text = $item
#Return the visioobject to be used
return $shpObj
}# Create VI Properties to extract vmtype
New-VIProperty -Name GuestFamily -ObjectType VirtualMachine -ValueFromExtensionProperty ‘guest.guestfamily’ -Force | Out-Null
New-VIProperty -Name GuestOSType -ObjectType VirtualMachine -ValueFromExtensionProperty ‘guest.guestfullname’ -Force | Out-Null# Create an instance of Visio and create a document based on the Basic Diagram template.
$AppVisio = New-Object -ComObject Visio.Application
$docsObj = $AppVisio.Documents
$DocObj = $docsObj.Add(“Basic Network Diagram.vst”)# Set the active page of the document to page 1
$pagsObj = $AppVisio.ActiveDocument.Pages
$pagObj = $pagsObj.Item(1)# Load a set of stencils and select one to drop
$stnPath = [system.Environment]::GetFolderPath(‘MyDocuments’) + “\My Shapes\”
$stnObj1 = $AppVisio.Documents.Add($stnPath + $shpFile1)
$VirtualMachine = $stnobj1.Masters.item(“Virtual Machine (3D)”)
$VirtualAppliance = $stnobj1.Masters.item(“3D Virtual Appliance”)
$vSphere = $stnobj1.Masters.item(“vSphere”)
$Clusters = $stnobj1.Masters.item(“Clusters 2”)
$VMware_Host=$stnobj1.Masters.item(“VMware Host”)
$datastores=$stnobj1.Masters.item(“Disks 1”)#Connect-VIServer “Your vCenter Name” -Credential (Get-Credential)
$allNODES = Get-Cluster $cluster | get-vmhost
$allclusters = Get-Cluster $cluster
$allVMs = Get-Cluster $cluster | Get-VM
$allDs = Get-Cluster $cluster | Get-Datastore#Set Start Locations of Objects
$x = 1
$y = .5#DRAW ALL Cluster-NODES
Foreach ($cluster in $allclusters) {
$y += 0.25
$clusterInfo = “CLUSTER: ” + $cluster.Name
$clusterObj = add-visioobject $Clusters $clusterInfo#DRAW ALL Datastore’s and connect them to the cluster object
Foreach ($d in $allDs) {$x = -3
$y += 1.5
$dsInfo = “Datastore: ” + $d.Name + “`nDSCapacity(GB): ” + [math]::Round([decimal]$d.CapacityGB,2)
$datastores = add-visioobject $datastores $dsInfo
connect-visioobject $clusterObj $datastores}
#DRAW ALL Physical VMHOST NODES with Node Name, Total Memory and vCenter version and connect them to the cluster object
Foreach ($node in $allNODES) {$x = 2
$y += 1.5
$nodeInfo = “NODE: ” + $node.Name + “`eSXIVersion: ” + $node.Version + “`nTotalMemory(GB): ” + [math]::Round([decimal]$node.MemoryTotalGB,2)
$nodeObj = add-visioobject $VMware_Host $nodeInfo
connect-visioobject $clusterObj $nodeObj# GET All Virtual Machines and drwa them based on the OS type and connect them to the Node object.
$allVMNodes = Get-VMHost $node | Get-VM | select guestfamily,guestostype | Group-Object guestostype |?{$_.name -ne ”} | select name,countforeach ($vm in $allVMNodes) {
$x += 2
$y += 1.5
$vmInfo = “VM_OSType: ” + $vm.Name + “`nNo_of_VM’s: ” + $vm.count
$VirtualMachine = add-visioobject $VirtualMachine $vmInfo
connect-visioobject $nodeObj $VirtualMachine}
}
}
# Resize the Visio so that all fits in one page, nice and clean.
$pagObj.ResizeToFitContents()# Save the Visio file generated in desktop for each of the cluster.
$DocObj.SaveAs(“C:\Users\trevor.G15IT2\Desktop\$cluster.vsd”)}
Here is a sample output of what it would look like after the script is run. 🙂
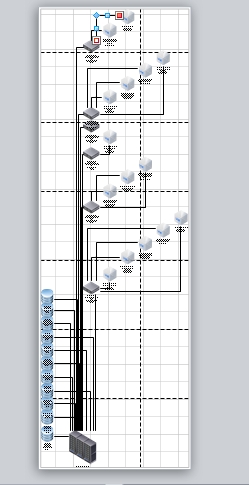
After to run this script, Microsoft Visio will open by itself and wherever you stored the output file you will find a Vision flowchart with a full layout of the VMware Datacenter this script was run against.
I hope this write up helps people that liked the article but found it was out-dated and didn’t work correctly. This take the guess work out of the issues and gets you results. Obviously the work of this script goes to the author, this is simply a write up on the troubleshooting to get it to work with VMware 5.5 and above. 🙂
Enjoy. 😀