9/20/18
Daily we are always reading about companies who are getting hacked and how salesmen’s laptops are being compromised. We as IT Professionals are tasked with protecting the systems and one system that get a lot of flack is Terminal Services. However with a strong password policy this can be mitigated from brute force attacks with automated lockout processes and auditing of these systems.
Below is a write up on the advised setting to ensure that your Terminal Server Farm is mitigated protected from attacks, in regards to logins, as best as it can be. Minus the attacker actually knowing the password, which falls into a insider knowledge or social engineering. Both of which is a end user training problem that needs to be addressed separately. These follow article is the best way to mitigate access if the password is NOT known while providing some margin for error by the authorized user.
Assumed below is that you have a Windows Server 2008 R2 thru Windows Server 2016 Terminal Server deployed and a Active Directory Domain controller that this Terminal Server is a member of.
Step 1.
Create a Terminal Server OU in AD.
Step 2.
Move the Terminal Servers in AD to this OU.
Step 3.
Open up Group Policy Management, alternatively open up run and type ‘gpedit.msc’
Step 4.
Navigate to the Terminal Server OU and right click on the folder and press “Create a GPO” and give this new policy a name, like “Terminal Server Password Policy”
Step 5.
Right click on the policy and press “Edit” and then Navigate to the following location: “Computer Configuration > Policies > Windows Settings > Security Settings > Account Policies”
Then expand inside of “Account Policies” expand “Password Policy” and “Account Lockout Policy”
Step 6.
Inside of Password Policy set each of the settings to the following:

20 passwords makes sure they never reuse the same password. We typically use 11 characters, but anything above 8 is pretty darn good aslong as complexity is enabled. But 1 extra character pretty much adds on another 100+ days to a password crackability. Then always encrypt the password too.
Step 7.
Inside of the Account Lockout Policy set each of the settings to the following:
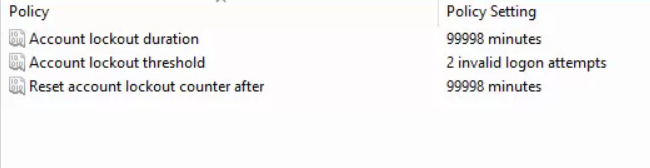
2 login attempts is what we use. Users typically know their complex passwords, and usually fail because of caps or num lock and get it on the 2nd attempt. 3rd time though is the charm of a brute force attack for the pessimistic IT person like me. 😛 ..Then the lockout duration is nearly as high as it goes because it requires an administrator to unlock the password in AD; it’s set this high for Terminal Services because it’s NOT AD so it just makes it way more secure and the risk of locking yourself out of AD is slim, unless you added a AD server to the filtering then I’ll just slap you now and won’t feel bad about it! 😉
Step 8.
Navigate to the following location: “Computer Configuration > Policies > Windows Settings > Security Settings >
Then expand into “Local Policies > Audit Policy”
Enable all of the audit rules for success and failure, You really only need login but it doesn’t hurt to enable them all. Just be mindful it add more logs to the event viewer folder and the C drive may fill up quicker. Then close out of the edit window.
Step 9.
Click on the policy inside of the Group Policy Management window and click on “Scope” which should be the default window. At the bottom you will see “Security Filtering”, click on the “Add” button.
Step 10.
Click on “Object Types” and check off the selection “Computers” – note you will need to do this each time you want to add a server – then enter in the name of the terminal server in question and click check name so it autofills the computer name, then press “OK”.
Step 11.
While still inside of the policy where you landed on the “Scope” Window click on the “Delegation” tab and make sure that the Terminal Server is show up as “Read (from Security Filter) and if not select the server and click “advanced” on the far right and adjust the setting for “Read” to be checked off as “Allow” only.
Step 12.
Double-checking the settings and then close out of the Group Policy Management. Then log into the Terminal Server in question and open up Command prompt, in an elevated state.
Step 13.
Type “gpupdate /force” and then at the end when it asks to log off press “n” and enter. Followup with making sure all users are off the server before performing the next task. After ensuring all users have saved their work and logged off, type “shutdown.exe /r” in command prompt and press enter. This will reboot the server and make sure the policy is applied to the server.
Note: Computer Configuration apply only on next reboot, User Configuration with the “gpupdate /force” happen instantly without a reboot.
This wraps up how to create a Password Policy for Terminal Services. This same policy could be applied to any server or desktop honestly but this is what it should be for Terminal Services to help migrate login risks which should be the 1st line of defense and the next is complex passwords and last is end-user security awareness around password protection and social engineering awareness.
The biggest security vulnerability is the end user, always!
Cheers!!!!
-Trevor